
 Korablev is a Russian based 3D artist, notorious for mechanical Steampunk themed still images. His main applications used are 3DS MAX, Photoshop and VRay.
His piece 'Rusty Sky' uses musky colours, possibly to symbolise the pollution from the industrial landscape in which this building sits it. Browns, greens and yellows are the three main colours used to form his work - all of which can be related to pollution and something acidic.
Korablev has gone into heavy detail in his building, it appears to be formed by thousands of pipes, valves and cogs; I find this interesting as it gives the eye allot to see and discover. The building is sitting on what looks like a floating surface suggesting it's in a futuristic era. All the edges are mangled and a majority of the scene is destroyed, going into great detail to show the complex network of wires exposed to the air.
The gradual fall off of the building into the polluted sky is a harsh warning to reality what the earth could be facing in the future unless things change and we stabilize the amount of pollution being pumped into the atmosphere.
Korablev has produced a complex Steam-Punk themed piece of art, composing it in a very effective way and draws you in to discover more in the picture, yet at the same time I believe he's added a message to the world in it and what the earth could become.
Experimentation Normal Mapping - 1
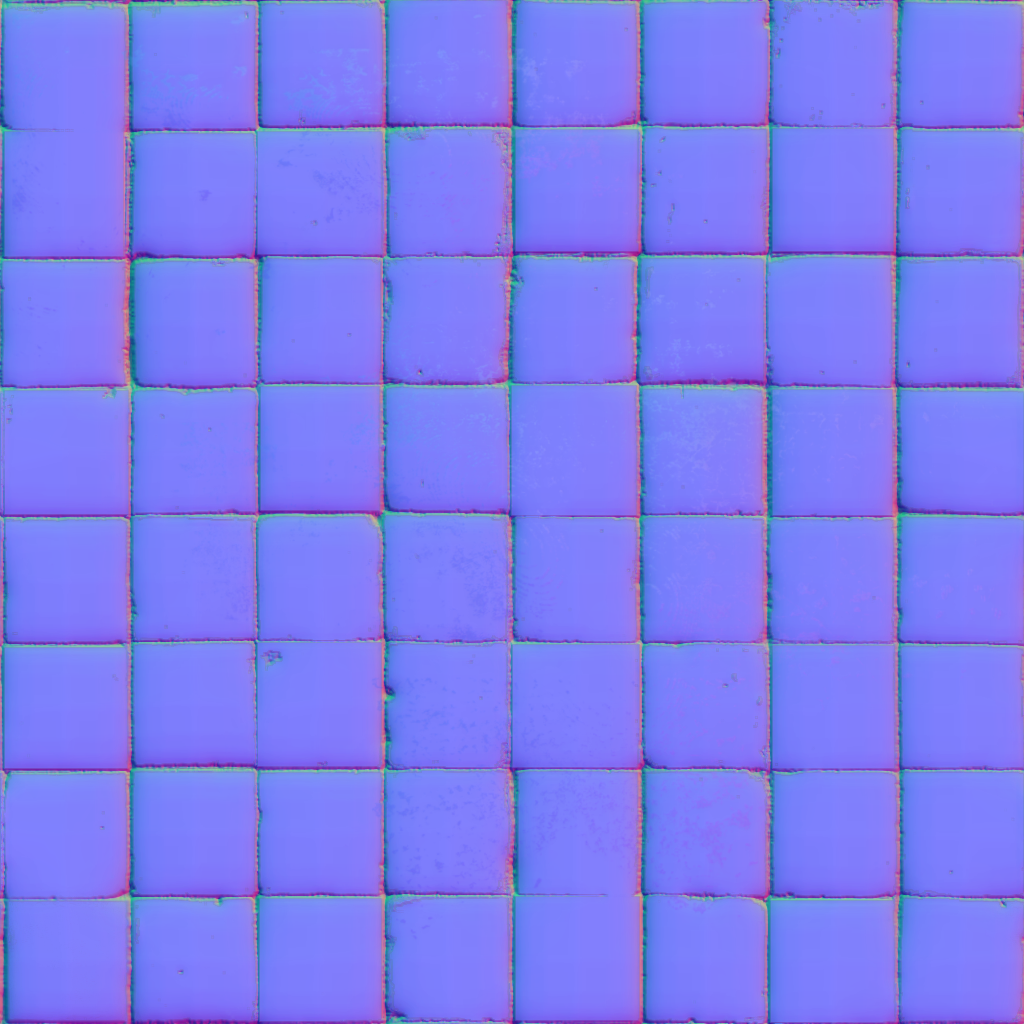
Aresnity Korablev made use of normal maps to bring out the details of objects in his scene, I did an experiment using the same 3D techniques to see if I could achieve something similar. Below you can see my experimentation, the normal map has made the surface appear to have bumps and crevices when it is just one single polygon plane.


Above you can see the normal maps I used for my normal map experimentation. The RGB values are what gives the information to your 3D package on how to create the illusion of depth.
Nikita Veprikov
 Nikita is a Ukraine based 2D digital artists, mainly producing her work with Adobe Photoshop. She actually occasionally implments 3D modelled objects into her scene, which can be a time saver. She specialises in fantasy characters and is known for capturing life in her pictures.
This particular image draws attention to me because of the strong use of lighting. the volumetric effects in this really create and atmospheric scene and gives you a good impression of the sky outside.I personally love, the dust particles floating around him - it gives it a rustic appearance. The characters disproportionate figure gives the image a humorous appearance and a cartoon influence style. I find it interesting that the face doesn't have a great deal of detail, just some soft shading. However, the armour and scene around him has a decent amount of detail. Such as the armour has intricate scratches and a weathered appearance to it.
 This surreal CG image straight away got my attention. It's composition gives it a subtle atmosphere and neutral impact by using a green colour scheme. The character is very unique and intriguing and gets you to look deeper into the image to understand it's origins and what it's about. I like the way nature has been implemented into the image, the organic forms and use of vegetation adds to its subtlety. Furthermore, the use of wooden furniture follows the theme of nature & earth.
Experimentation Lighting - 2
Experimentation - 2Veprikovs work often has strong emphasis on lighting, the lights are often powerful and eye catching. In the piece above the volumetric lights really help build on the atmosphere and set the mood for this character. I decided to go ahead and play around with lighting in Maya as I will have to light and render my final project, I used some models I previously models as examples to light.


 Alessandro Baldasseroni
Alessandro is a 3D artist, specialising in character creation usually to realistic standard. This particular image is a stylized character and an artist’s interpretation of a soldier. The objective of this image appears to be experimenting with posture and realism in a render.
There is a humorous mood to the photo, due his facial expression and his body shape is not typical for a soldier, facial expressions play a role in the overall atmosphere for image and the impression it’s giving to the audience and in this case it’s humour. Detailed texturing and shading has been used on this image for realism even though it is a fictional cartoon character, adding realism can usually expresses a concept more easily for the audience to interrupt.
Lighting has played a key role in achieving the realism; you can see that he is being lit from multiple sources which is usually the case when you’re in an indoor environment. The soft shadows create a calm feel about the image and along with the position he is in, there is no aggressive aspects to the image, which is not what you would expect off a soldier. Specular lighting on his boots and pouches gives you a better idea of where the light sources are coming from and on top of that it creates more a more accurate interaction with light.
The impact this image has on its audience is most definitely humorous, and drawing attention to detail is another objective Alessandro wants to achieve. Cartoon characters generally aren't too detailed, but it is different in this case and I believe the added realism gives image more life as a character.


Experimentation Evaluation
Research played a strong role in my experimentation it showed myself what is possible in terms of software packages. Furthermore, I can gather research on problems that previous people encountered doing similar style imagery to myself. Alessandro Baldasseroni encountered some problems with normal mapping in his military character as an example. The research gave my inspiration for my idea in terms of composition, lighting, atmosphere and intricate details on 3D models, I plan to implement aspects of my artist research in my final image.
The experimentation process was to show and learn if what I planned to do was achievable. It was beneficial to myself, it showed me that a majority of the technical side of my experimentation is possible to do. I started off by looking at normal mapping, a process used to simulate rough/bumpy surfaces through illusion of light. This went successfully, you can see the images above demonstrating the outcome for this.


In the image above you can see the lighting setup I used for my scene, it is simply just one skydome light and one area light and the results are very pleasing, this gives me confidence when it comes to lighting to final project and tells me it is achievable.
Experimentation Photoshop - 3
For this experimentation I did some practice is post production which was evident in all the work I looked at. This process involves tweaking the colours and overall look of the image in post production software such as Photoshop, which I would be using for my final image.


You can see the comparison between the raw render and the final composited image, simplistic tweaks to colours can make a huge difference in terms of realism and the impact of the image, this is something I have always been interested in and will concentrate a lot on in my FMP.

Alessandro is a 3D artist, specialising in character creation usually to realistic standard. This particular image is a stylized character and an artist’s interpretation of a soldier. The objective of this image appears to be experimenting with posture and realism in a render.
There is a humorous mood to the photo, due his facial expression and his body shape is not typical for a soldier, facial expressions play a role in the overall atmosphere for image and the impression it’s giving to the audience and in this case it’s humour. Detailed texturing and shading has been used on this image for realism even though it is a fictional cartoon character, adding realism can usually expresses a concept more easily for the audience to interrupt.
Lighting has played a key role in achieving the realism; you can see that he is being lit from multiple sources which is usually the case when you’re in an indoor environment. The soft shadows create a calm feel about the image and along with the position he is in, there is no aggressive aspects to the image, which is not what you would expect off a soldier. Specular lighting on his boots and pouches gives you a better idea of where the light sources are coming from and on top of that it creates more a more accurate interaction with light.
The impact this image has on its audience is most definitely humorous, and drawing attention to detail is another objective Alessandro wants to achieve. Cartoon characters generally aren't too detailed, but it is different in this case and I believe the added realism gives image more life as a character.
Experimentation Posing - 4
This experimentation is based on Alessandro's work, you can see in his 'soldier' image the pose of the character is vital to giving the impression he wants to give. I did my own experimentation on a preset character in ZBrush, the idea was to see if I would easily be able to pose a character as this is what I would like to do for my final image, you can see the results below.

Experimentation Detailed Modeling - 5
Many of the artists I research had a strong emphasis on detail and this is something I would like to achieve in my final image. To experiment this I decided to create a simple pickaxe in ZBrush and add extra fine details such as the crevices on the wood of the pickaxe. In my personal opinion this experimentation was successful and showed that I was capable of going into the amount of detail as planned.

Research played a strong role in my experimentation it showed myself what is possible in terms of software packages. Furthermore, I can gather research on problems that previous people encountered doing similar style imagery to myself. Alessandro Baldasseroni encountered some problems with normal mapping in his military character as an example. The research gave my inspiration for my idea in terms of composition, lighting, atmosphere and intricate details on 3D models, I plan to implement aspects of my artist research in my final image.
The experimentation process was to show and learn if what I planned to do was achievable. It was beneficial to myself, it showed me that a majority of the technical side of my experimentation is possible to do. I started off by looking at normal mapping, a process used to simulate rough/bumpy surfaces through illusion of light. This went successfully, you can see the images above demonstrating the outcome for this.


